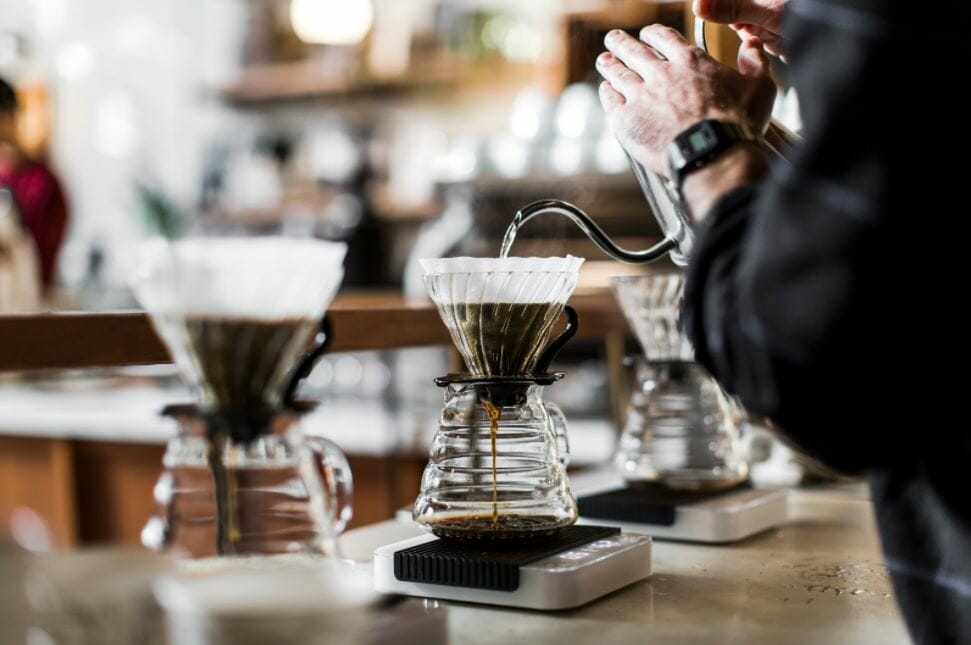
By the time a coffee arrives at your doorstep, it has traveled a long distance and has been transformed from an agricultural product into freshly roasted beans ready to be ground and brewed. We recognize the effort, time, and energy that goes into making the decisions about things like growing variables, processing, and roasting that factor into creating an exceptionally high-quality coffee. However, the truth is that none of that means it will be the best coffee you’ve ever had if it isn’t properly brewed. When preparing your coffee at home, you are the last factor in this long, energy-intensive coffee supply chain. You become an active participant in bringing the specialty coffee to life and ultimately influencing the taste, for better or for worse. That is why understanding the brewing process can help to turn that specialty-grade bean into something delicious, every time.
Brew Guide Table of Contents
What is Brewed Coffee?
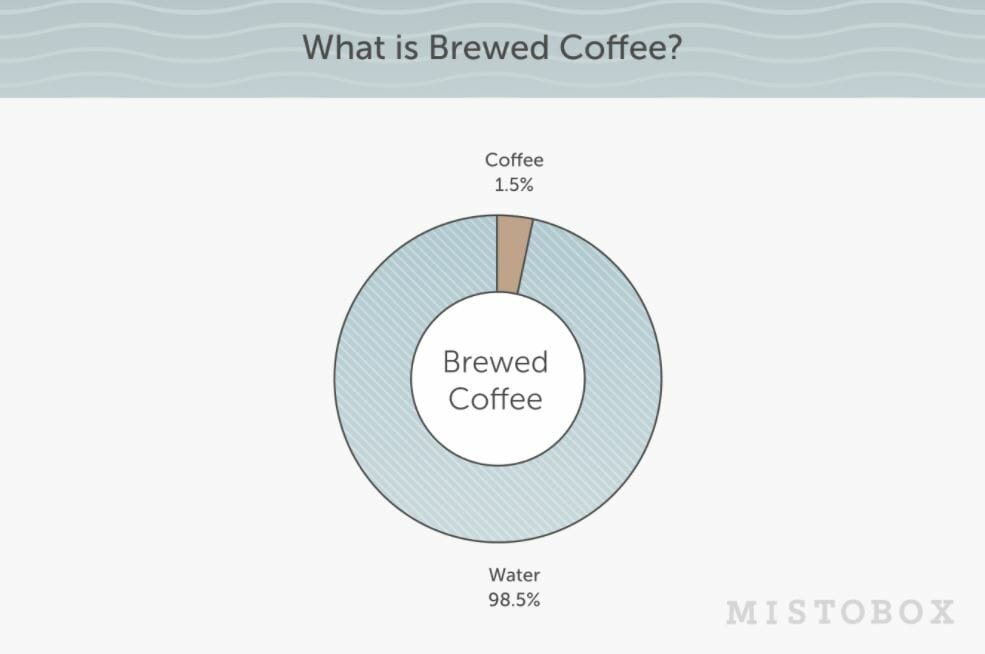
Brewing is the process by which coffee grounds are introduced to water and where the soluble compounds that create the delectable flavors and aromas are dissolved into the water. The final product is what we call brewed coffee. Brewed coffee is made of about 98% water and 1-1.5% dissolved solids that come from the coffee grounds. In the coffee industry we like to talk about TDS or Total dissolved solids which in reference to brewed coffee can be thought of as coffee flavor or the amount of coffee in your coffee. The concentration or strength of brewed coffee is determined by TDS. The higher the TDS, the stronger your brewed coffee.
The Science of Brewing Coffee
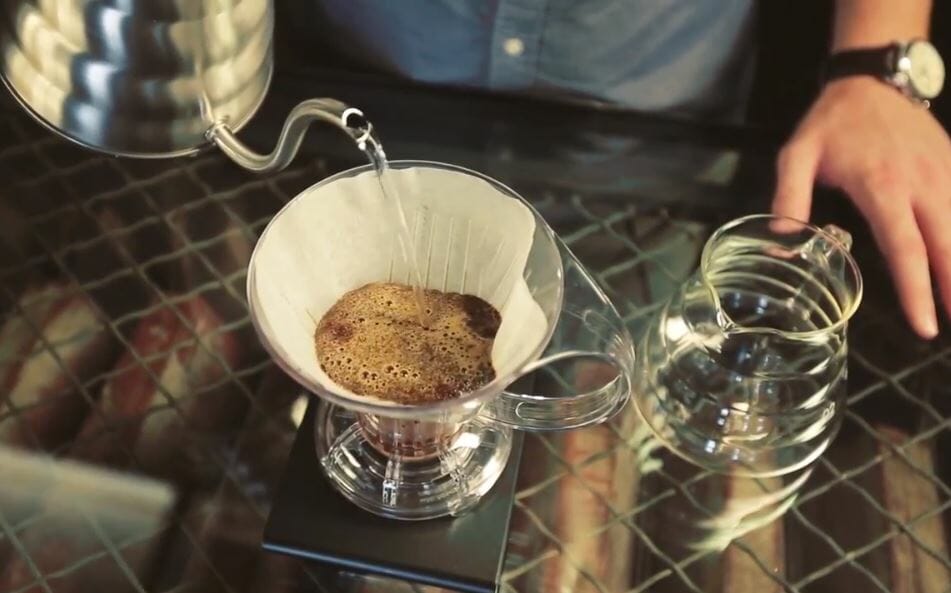
For our purposes, the terms “extraction” and “brewing” can be used interchangeably to describe the brewing process. While each method is unique, generally for brewing to occur, you must add water to your coffee grounds. Once you’ve introduced water to the grounds, the wetting stage begins by displacing gases like carbon dioxide (CO2) from inside the coffee cells into the surrounding liquid and atmosphere. We often refer to the wetting stage as “the bloom”. The bloom phase or blooming requires adding a small amount of water to your coffee grounds at the beginning of the brewing process. If you are brewing with 20g of coffee, you would add roughly 40g (double) of water for the bloom. Once your grounds have been evenly saturated, allow the brew to sit for 30-45 seconds before you begin adding more water. While the coffee sits you’ll notice bubbling as the CO2 is being released from the coffee grounds. We call this degassing.
Why do we bloom? CO2 is a byproduct of the roasting process and prior to brewing, it is trapped inside of the coffee. CO2 essentially inhibits proper extraction by pushing water away from the grounds. We want our water to permeate the coffee grounds instead. You’ll want to bloom your coffee to encourage the release of trapped CO2 before you begin the extraction phase. By blooming, you make it easier for the water to pull out flavor. Once these gases have been released, the extraction stage begins as the coffee particles begin to absorb the water, dissolving soluble solids and aromatic compounds into the slurry. “Slurry” is a word used to describe the mixture of coffee grounds, water, and gases that have yet to pass through the filter during the brewing process.
During extraction, there are numerous chemical reactions taking place that transfer the coffee solubles from the coffee grounds into the water. The following three reactions can and will happen simultaneously and each depends on brewing variables such as temperature, time, and agitation which we will discuss later on.
Hydrolysis is a general chemical reaction that occurs when a compound is broken down by water. Through hydrolysis large molecules (carbs, acids, proteins) that cannot dissolve into the water are broken down into smaller molecules that can be.
Dissolution occurs when compounds dissolve into the water (the solvent) to form a solution. This happens naturally when water moves over and through the coffee grounds during brewing. Chlorogenic, acetic, malic, and other acids are a few compounds that are dissolved through the brewing process.
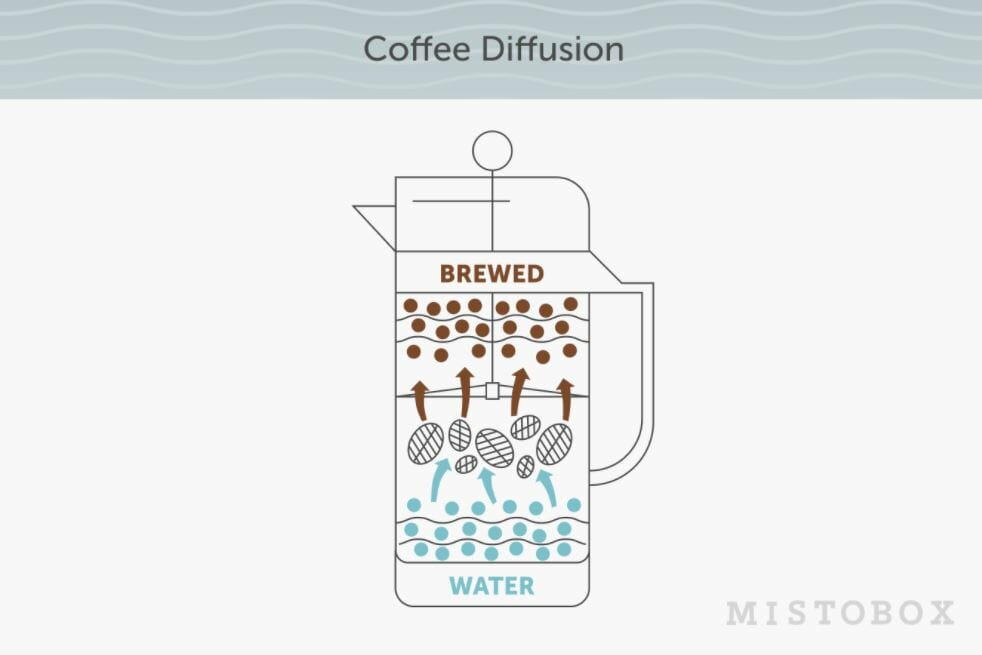
Diffusion occurs when solubles move from areas of high concentration (the coffee grounds) to areas of lower concentration (the water) through osmosis. Once the coffee particles are saturated with water the process of osmosis takes effect to draw the coffee chemicals out of the grounds and into your brewed coffee. After wetting, your coffee grounds are more concentrated inside than outside, so by osmosis the water that was absorbed into the grounds leaves, pulling desirable flavors out of the coffee bean and into the brew liquid.
What is Under, Over, and Ideal Extraction?
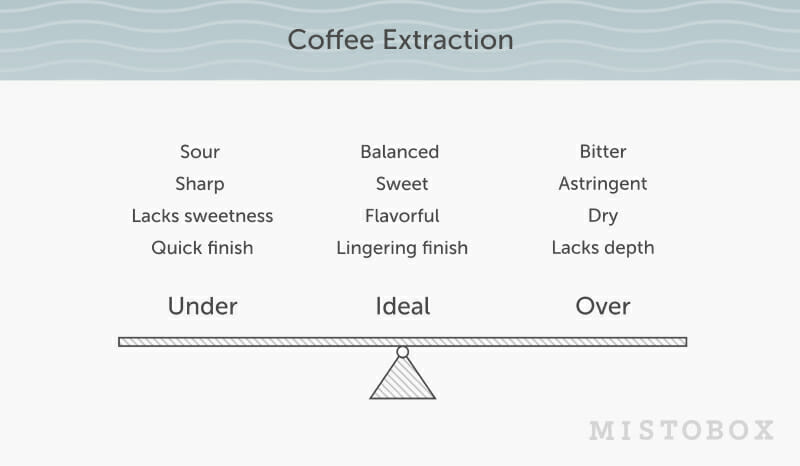
During the brewing process, different flavors extract at different times. Generally speaking, acidic and fruity flavors are extracted first, followed by sweet and bitter flavors. The goal with brewing is to pull as many desirable flavors (acids, fats, sugars, and fruity flavors) from the coffee grounds as possible without taking it too far and pulling out undesirable coffee flavors that dominate the pleasant ones (bitterness and astringency). Think of extraction as a scale we are trying to balance to get the right flavors and taste of coffee.
Under extracted coffee is a scenario where not all of the desirable flavors have been extracted from the coffee grounds. The water hasn’t had enough time to break down and pull out the sugars, which balance out the sour acids that are extracted quickly. An under extracted brew will likely taste sour or sharp, have an oily body, and a quick finish.
Over extraction occurs when you’ve taken your brew too far. A tipping point is crossed as extraction continues to occur and undesirable flavors are also extracted. In this scenario, the water has broken down sugars and plant fibers that contribute to bitterness. These undesirable flavors, such as bitterness, alter and mask the more desirable traits like sweetness. An over extracted brew will taste dry, astringent, and bitter.
Ideal Extraction is our balanced scenario when all desirable flavors are extracted from the coffee grounds (acids, fats, oils, sweetness, balanced with a little bitterness) and the process stops before the coffee becomes too astringent or bitter. This is our goal every time and is what makes a great cup of brewed coffee. The cup will have more of a rounded, creamy, or syrupy body with optimal sweetness and a pleasant, lingering finish.
Brewing Variables that Influence Extraction
Factors that will affect the efficiency and quality of the brewing process and will ultimately impact the flavor perception of the final product are:
- Contact time & grind size
- Type of water
- Water temperature
- Turbulence (how much agitation or stirring occurs)
- Filtration type
- Brew method
By understanding these variables you, as a home brewer, can adjust to get the ideal extraction and your perfect cup of coffee.
Contact Time & Grind Size
Contact time is the length of time the grounds and water are in contact with each other. As we already outlined above when we discussed extraction, generally speaking, the longer the coffee particles and water are in contact with each other, the higher the overall extraction will be. In addition to the contact time, the rate of extraction is also influenced by the particle or grind size of the ground coffee.
Smaller, more finely ground coffee particles have more surface area exposed to the brewing water so that the dissolvable solids are more readily available, and the distance that the coffee flavor particles must travel to the surrounding slurry is shorter. Think of the difference in time it takes for a large piece of ice to melt versus the time it takes for ice chips to melt. Smaller pieces will more quickly dissolve into water. This means that coffee that is ground into smaller particles, usually referred to as “fine”, will extract much more quickly than larger or “coarse” grounds. Since the rate of extraction is higher for finely ground coffee particles, the overall contact time required for smaller particles to reach an ideal extraction is shorter than more coarsely ground coffee. This information is important to consider for each brew method, as different methods of extraction, such as gravity-based filter brewing, full-immersion, or espresso preparation, each requires considerably different particle sizes for optimal extraction.
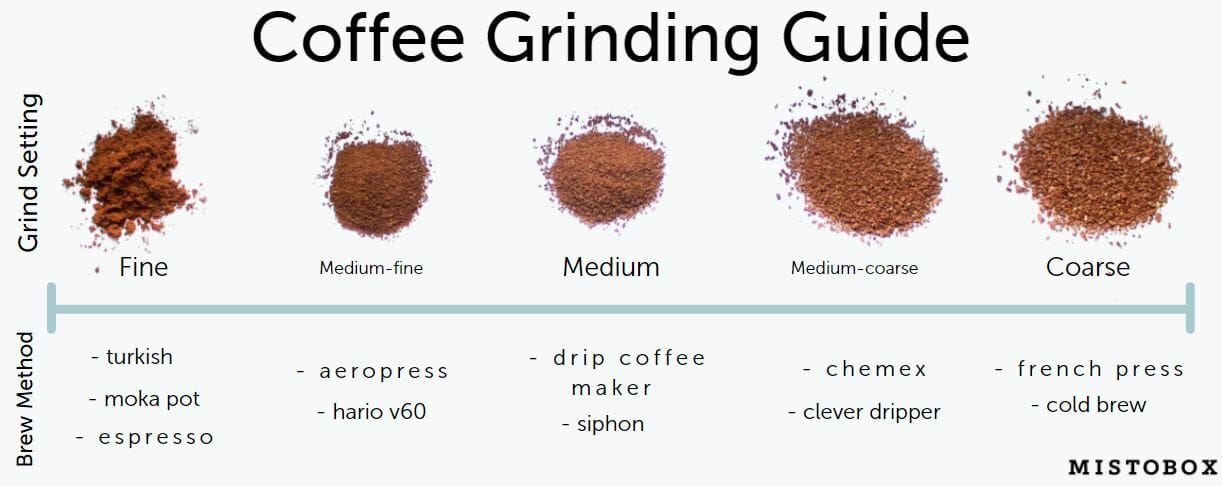
Choosing the proper grind size for each brew method is a critical part of successful brewing and it will affect every other variable in the brewing process, such as which brew method to choose in the first place, the type of filter you’ll select, contact time, and the desired quantity of coffee to be brewed. Keep in mind that all of the brewing variables are interdependent. Here are a few tips to consider when grinding:
- Shorter contact times and smaller batch sizes require a finer grind size.
- Longer contact times and larger batch sizes require a larger grind size
- Espresso and pressurized extraction methods often require a very fine grind size due to the short brew times and rapid extraction of soluble solids, aided by pressure and more stable heat.
- Gravity-based filter methods (pour-over brewers, automated drip machines, steep and release drippers) typically require medium-fine, medium, or medium-coarse grind sizes depending on batch size, contact time, and filter type. The larger the batch, the coarser the grind is needed.
- Full-immersion methods (French press and cold brew) usually require a medium-coarse to coarse grind size depending on filter type, batch size, and contact time. Since these methods take longer, usually 4 to 5 minutes for hot brewing and 12 to 24 hours for cold brewing, they need a larger grind size to account for the longer total brew time.
Water
Water is one of the most important factors involved in brewing coffee, but it often gets overlooked when evaluating brewing variables and troubleshooting potential problems. Brewed coffee is over 98.6% water and espresso is usually around 90% water. This means that no matter how great your coffee beans, brewing equipment, and technique are, if you start with poor quality water, you’ll likely end up with a lackluster cup of coffee.
Can I use tap water to brew coffee?
It depends on your tap water. Keep in mind that most water is not just water, but has minerals and other particles dissolved in it to give it a TDS (total dissolved solids) level. The Specialty Coffee Association recommends using clean and fresh water that is 150 ppm (mg/L), free of odor, and has a neutral pH level for best brewing results. While 150 ppm TDS is the target, the recommended range can be as low as 75 ppm or as high as 250 ppm. In this range, water usually tastes like mountain spring water and is optimal for brewing coffee. If there are too few dissolved minerals (< 75 ppm), the water can taste flat and lack depth. Conversely, the presence of too many dissolved solids (> 250 ppm) can produce water that tastes muddy, muted or dull. The SCA also recommends using water at a hardness level of around 70-80 ppm (mg/L) of combined calcium and magnesium. This concentration has enough mineral content to provide sufficient body and mouthfeel to a coffee, while limiting the potentially chalky textures or buildup problems within brewing equipment found at higher levels. By simply using good, fresh, and clean filtered water, you’ll be able to prevent any issues that might otherwise arise from using overly hard water.
It can be difficult to track down the specific TDS and hardness measurements of your water since it varies widely city to city but it can generally be assumed that the following water sources will have levels that fall within these ranges:
- Filtered Tap Water: 50-800 ppm (varies widely by geographical location)
- Distilled Water: 0-2 ppm (TDS too low)
- Bottled Drinking Water: 2-250+ ppm (varies by brand)
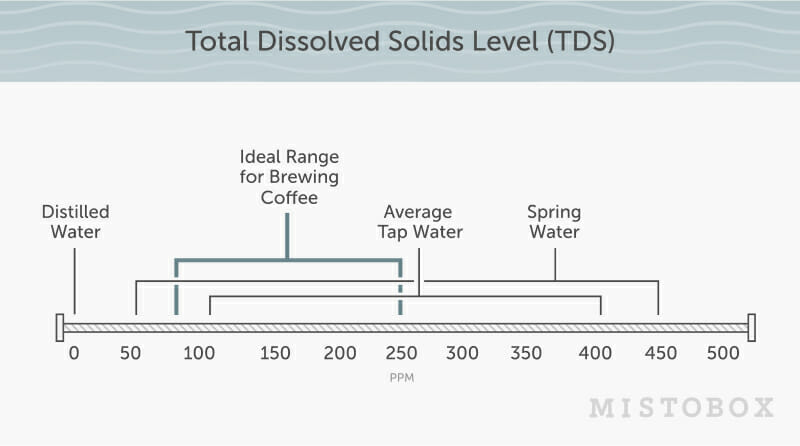
If you are going to use tap water we recommend using a gravity-based carbon filter (like a Brita) to remove chlorine. Chlorine is added to most municipal water to make it safe to consume, but it can also bind with phenols from the coffee to produce chlorophenol, an awful tasting chemical that will undoubtedly detract from delicious coffee flavors. Using something like a Brita filter will ensure the water you are using for coffee is safe and the taste won’t be affected by chlorophenols. Unfortunately, carbon filters, like the Brita, do little else to remove dissolved chemicals and minerals from water, so the TDS and hardness of tap water can still fall above the ideal range, potentially producing other off-flavors or causing limescale to build up on brewing equipment.
How do you measure the TDS of your water?
The best way to measure the TDS of your water is to purchase a TDS meter. They are relatively affordable, starting at around $20 and are widely available. Note that measuring the TDS simply provides a numerical value for the total quantity of dissolved materials, but does not give any indication for which minerals and chemicals are present. As such, knowing this number can tell you if the TDS of your water might be causing taste issues with your coffee, if you need to replace your water filter, or if you should consider upgrading to a Reverse Osmosis system.
Temperature
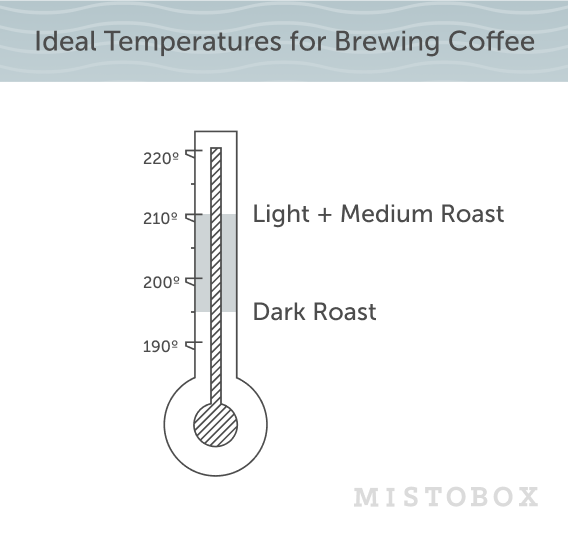
The higher the temperature of the brew water used, the higher the rate of extraction. This is because the compounds within coffee typically dissolve easier when exposed to more energy in the form of heat. Most coffee resources recommend an average slurry temperature between 195ºF and 205ºF for ideal brewing. Remember that this range refers to the average slurry temperature during extraction, not the starting water temperature before brewing begins. Water can lose heat quickly, especially with smaller volumes used when brewing a single cup, as the atmosphere or the material of the brewer itself can pull heat away from the water.
To get the slurry temperature ideal for the entirety of the brewing process and to compensate for heat loss we recommend beginning brewing with a higher water temperature. For light to medium roasted coffees, we think it’s best to use a starting water temperature of 208ºF – 212ºF (98º-100ºC), effectively just below boiling. This is effective because these coffees tend to be more dense and it’s more difficult to extract the desirable flavor compounds. Coffees that have reached a higher degree of development during the roast process (medium-dark to dark roasted coffees) more readily release soluble material during extraction and therefore don’t require as much heat to extract. In our experience, we have found that lower starting temperatures, like 195ºF – 200ºF (90º-93ºC), work just fine for dark roasts and prevent over-extracting some of the more bitter and harsh flavors.
Turbulence
A little agitation, also known as stirring, can go a long way to increase the rate of extraction. As coffee begins to extract from the grounds, the concentration of solids dissolved into the liquid closest to the coffee particles is higher than the areas that are farther away from the grounds. By giving the grounds a little stir, you are more evenly dispersing the concentration of soluble solids throughout the slurry and therefore the concentration difference between the coffee particles and the surrounding brew liquid is higher. This encourages extraction from the coffee particles to the surrounding slurry, getting you your ideal extraction a little quicker.
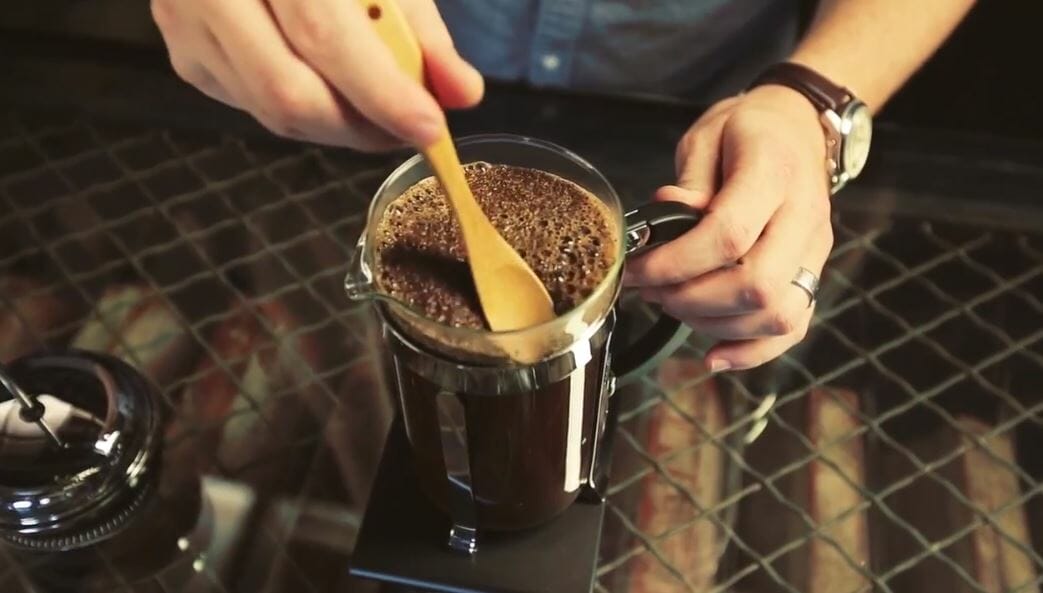
Turbulence can come from a number of external forces. Stirring the slurry, pouring water over the grounds from a kettle, or a spray head in a coffee maker are the most common external forces that result in agitation and will ultimately affect the rate of extraction and therefore the final product. Turbulence can also aid in evenness of extraction by helping to ensure that all coffee grounds are saturated quickly. We like to use a spoon to stir the slurry during the “bloom” or wetting stage to ensure all grounds have been evenly saturated early on for a more uniform brew.
Keep in mind that stirring will also lower the temperature of your slurry which can slow your extraction back down. Be mindful of when and how much you are agitating so as not to cool the slurry too much, and do so in a consistent and easily repeatable motion so that subsequent brews will produce similar results. Nothing is worse than having the perfect extraction and not being able to replicate it.
Filtration and Flavor Perception
The type of equipment or device used to brew coffee will have a significant impact on the way the coffee will taste. This is due to the shape and size of the brewer, the batch size, and the technique by which the coffee is brewed. However, it’s the type of filter used for each brewer that will have the greatest impact on mouthfeel, flavor clarity and brewer’s overall perception of flavor when enjoying the brewed coffee. This is because different types of filters can change what physically ends up in the cup and what stays behind. Listed below are the most common filtration types used in coffee brewing and how they can impact the flavor perception of the final product.
- Paper filters are among the most commonly used filters in coffee brewing. With a few exceptions, paper filters are mostly used in gravity-based drip brewers like automatic coffee makers and manual pour-over brewers like the Chemex or Hario V60. From a flavor standpoint, paper filters produce a coffee drinking experience with the cleanest perception of flavor. This is due to the fact that paper filters are composed of extremely tightly bound paper fibers that retain both large and very small insoluble materials, along with a good amount of fatty oils produced during brewing. By reducing the amount of the fine insoluble particles and oils, called the brew colloids, you’ll have a much greater opportunity for clarity of flavor. This means that coffees filtered through paper tend to be lighter in mouthfeel and body, but contain more easily distinguished flavors.
- Metal and Mesh filters typically yield brewed coffee with a heavy mouthfeel, full-body, and a low to medium level of flavor clarity. The perforated metal and metal wire mesh can separate the brewed coffee from the coffee grounds, but it doesn’t hold back everything. These filters are usually unable to fully restrict brew colloids, the fine insoluble particles, and oils, which results in a heavier and sometimes ‘dirtier’ mouthfeel that emphasizes body over clarity of flavor. The common french press is a popular brewing method that uses this type of filter.
- Cloth Filters are typically woven tightly enough to hold back larger insoluble particles, but small insoluble particles can make it through the seams and some oils always will end up in the cup. This generally results in a cup with a mouthfeel and clarity between that of paper and metal filters. With this type of filtration, we generally taste a medium to heavy body with a medium level of flavor clarity. Proponents of cloth filters love them for being able to taste the oils without most of the gritty insoluble particles found with mesh filters.
It’s worth noting that all of the above filter options have size options within their category that vary in density and can affect your desired mouthfeel or body of coffee. Once you’ve decided on the ideal filter type you can try different sizes. Generally- the larger the size, the heavier the mouthfeel and the lower the clarity as you’ll be getting more oils.
To summarize: Love body and a lingering finish? Try a metal or mesh filter. Love clarity of flavor with less body? Go for a paper filter.
Brewing Method
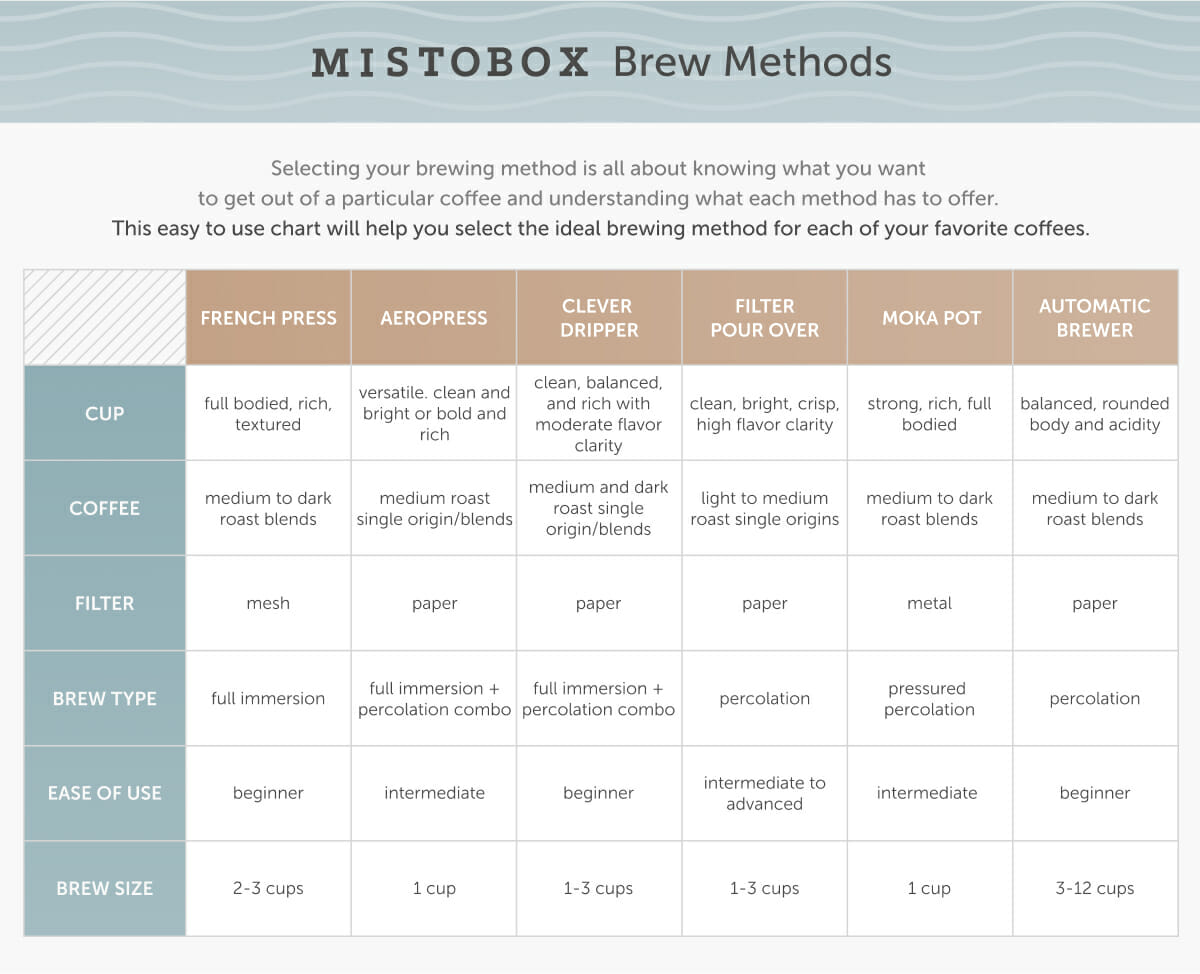
Finally, the device you choose to use for brewing coffee will also have a significant impact on the way the coffee will taste. As mentioned, this is due to the shape and size of the brewer, the batch size, filter type, and the technique by which the coffee is brewed. Brewing method selection is all about knowing what you want to get out of a particular coffee and understanding what each method has to offer. The same coffee brewed with different methods will have different perceived tastes and characteristics. Below are some of our favorite brewing methods and how they influence flavor perception. For a more in depth look at each Brewing Method, join us next week!
Brewing Takeaways
1. Use good water for good coffee
2. Use paper filters for flavor clarity, mesh/metal for increased body and mouthfeel
3. If your coffee isn’t tasting right (sour or bitter) try changing your brew variables: temperature, time, grind size, and turbulence.
Cheat Guide to Perfect Brewing
If your coffee tastes too sour, bright, acidic, or weak try the following:
- using a higher brew ratio (increase the amount of coffee used in relation to water)
- using a slightly finer grind
- agitating (stirring) the grounds while brewing
- increasing water temperature
- increasing contact/brew time
If your coffee tastes too bitter, intense, chalky, or bold try the following:
- using a lower coffee to water brew ratio (decrease the amount of coffee used in relation to water)
- using a coarser grind
- decreasing contact/brew time
- decreasing water temperature
Learn more about coffee and taste with our series and check out our Specialty Coffee article, Guide to Coffee Cupping or Strong vs Rich vs Bold Coffee: What’s the difference? and Understanding Coffee Taste.

